EasyIdentity can help you create user accounts in the licensed Zoom App based on the user accounts you manage in EasyIdentity. Alternately, you can import user accounts from the Zoom App into EasyIdentity. EasyIdentity also provides you with the option to keep all of your user accounts synced-up between EasyIdentity and Zoom at all times. So, the choice is yours. Here is how you can create user accounts from EasyIdentity into the Zoom App.
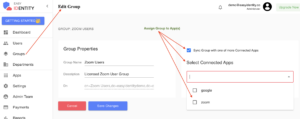
In EasyIdentity, you can assign the Zoom App to one or more Users by simply Creating a Group called Zoom Users (or any other name you like) and then adding/assigning the licensed Users to this Group. Now you assign the Zoom App to this Zoom Users Group.
Step-1: Login to EasyIdentity as an Administrator.
Step-2: Click on the “Apps” menu in the left hand navigation bar.
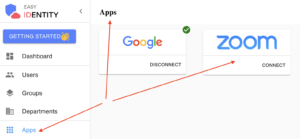
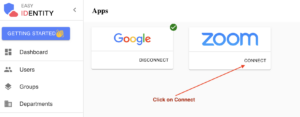
Step-3: Now click on the CONNECT link on the Zoom logo. This will redirect you to the Zoom website login page.
Step-4: Now login using your Zoom Admin Credentials on the Zoom website and provide permissions for the Zoom App to release user account information, and click on “Allow”.
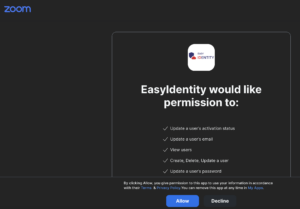
Step-5: Now Click on Apps in the navigation panel again and you will see the Zoom logo with the text “DISCONNECT” along with a green tick mark at the top right hand corner. This means that Zoom is now connected to EasyIdentity. Click on the Zoom logo now and you will then see the following screen with three tabs – Info, Users and Groups. Most of the information on this screen is self-explanatory.

INFO Tab – give you high level information along with the ability to turn bi-direction sync (between EasyIdentity and Zoom) ON or OFF. By default, it is set to ON.

Users Tab – As shown below, it shows you the list of User Accounts imported from Zoom.
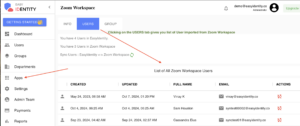
By clicking on the Red icon under ACTIONS, you can sync each of the Zoom User Accounts shown with EasyIdentity.
The Zoom Users shown above in EasyIdentity are imported from the Zoom App as shown below –

Groups Tab – As shown below, it shows you the list of Groups imported from Zoom.
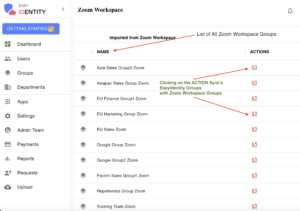
By clicking on the Red icon under ACTIONS, you can sync each of the Zoom Groups with EasyIdentity and vice-versa.
The Zoom Groups shown above in EasyIdentity are imported from the Zoom App as shown below –
 –
–
EasyIdentity is now connected to the Zoom App. Now, you can provision EasyIdentity Users or Groups into the Zoom App.
User based Account Provisioning from EasyIdentity to the Zoom App.
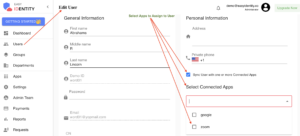
Step-1: Select Users (from the navigation panel) followed by Edit User (from the ACTIONS column).

Step-2: Now click on the Connected Apps pull-down menu and select the Zoom App, and SAVE. This will provision this User into the Zoom App.
Group based Account Provisioning from EasyIdentity to the Zoom App.
Step-1: Select Groups (from the navigation panel) followed by Edit Group (from the ACTIONS column).

Step-2: Now click on the Connected Apps pull-down menu and select the Zoom App, and SAVE. This will provision this Group into the Zoom App.
